はじめに
2022/6/21にプレスリリースが出ていますが、Linux FoundationにてOPI (Open Programmable Infrastructure) プロジェクトを推進することになったようです。
新プロジェクトOpen Programmable Infrastructureを発表
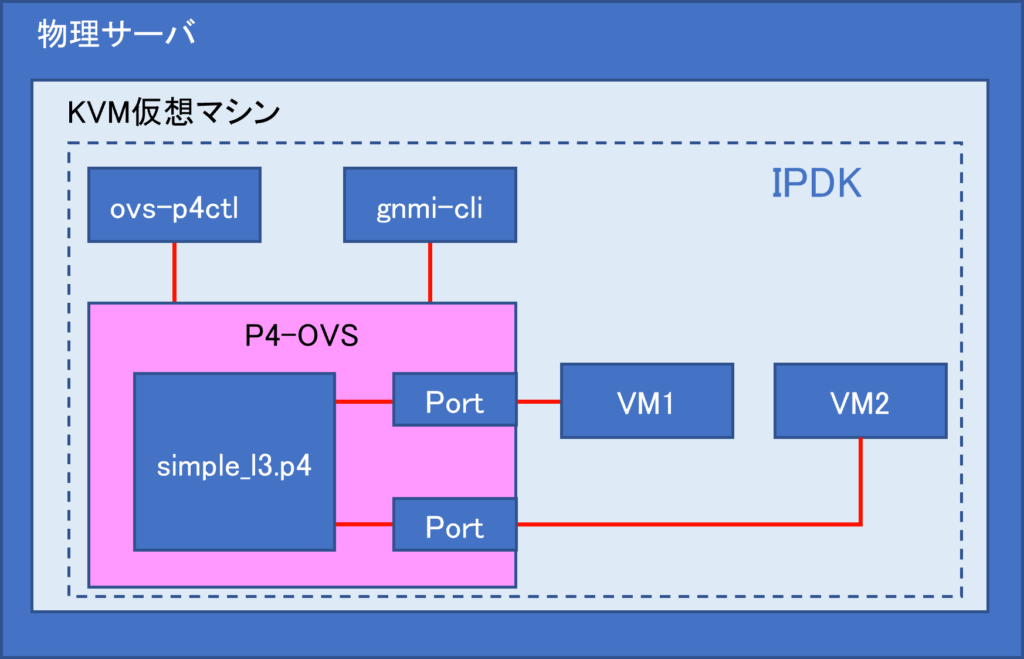
こちらのプロジェクトの中心になるソフトウェアがIPDK (Infrastructure Programmer Development Kit) です。このソフトウェアは、アプリケーション間のネットワーク機能の一部をプログラミングすることで、ネットワーク機能のハードウェアオフロードやネットワーク機能の拡張を可能にします。IPDKでは、ネットワーク機能のプログラミングにP4言語を使い、ターゲットに依存しない作りを目指しています。ですので、ハードウェアターゲットはこちらのリストの通り、P4プログラマブルスイッチだけでなく、IPU/DPUなどのスマートNICも考えられています。またハードウェアが無くてもKVM仮想マシン内でCPUベースでもIPDKを試せる環境として、"P4 DPDK Dataplane"も用意されています。この記事では、KVM仮想マシンにてIPDKの動作を確認する方法を共有させていただきます。
本記事の実験環境の条件
https://github.com/ipdk-io/ipdk
本記事で動作確認を行ったcommit番号は9f36013a41b19ea126aa7342a12915d9c5b7075cです。こちらを仮想マシン環境で実験するための方法として、以下の通り、二種類用意されています。
- コンテナベース
https://github.com/ipdk-io/ipdk/blob/main/build/networking/README_DOCKER.md - ホストにネイティブなアプリとしてインストール
https://github.com/ipdk-io/ipdk/blob/main/build/networking/README_NATIVE.md
- CPU: 16コア
- メモリ: 16GB
- ストレージ:64GB
- Nested KVMの設定 こちらの記事などを参考に、cpu mode = 'host-passthrough"を設定

IPDKのインストール
sudo su -以下のように/gitディレクトリを作り、そこでIPDKのソースコードをgit cloneします。
mkdir /git
cd /git
git clone https://github.com/ipdk-io/ipdk.git
IPDKのビルドの前に、まず依存ツールをインストールします。
/git/ipdk/build/networking/vagrant-native/provision.shそのままIPDKのビルドを実行すると、途中でエラーが発生します。本記事の動作確認時点では、以下の修正が必要でした。
root@ipdk-kvm:/git/ipdk# git diff .
diff --git a/build/networking/scripts/build_p4sde.sh b/build/networking/scripts/build_p4sde.sh
index 5b5f875..d094791 100755
--- a/build/networking/scripts/build_p4sde.sh
+++ b/build/networking/scripts/build_p4sde.sh
@@ -58,12 +58,14 @@ echo "Removing p4-driver repository if it already exists"
 if [ -d "p4-driver" ]; then rm -Rf p4-driver; fi
 echo "Compiling p4-driver"
 #TODO: Below link needs to be updated when code is open-sourced
-git clone https://github.com/p4lang/p4-dpdk-target.git --recursive p4-driver
+git clone https://github.com/p4lang/p4-dpdk-target.git
+mv p4-dpdk-target p4-driver
 cd p4-driver
 git checkout 780b3dfa205815e87f4580383cc37bfa30187f7c
+git submodule update --init --recursive

 pip3 install distro
-cd p4-driver/tools/setup
+cd tools/setup
 if [ "${OS}" = "Ubuntu" ]; then
     echo 'debconf debconf/frontend select Noninteractive' | debconf-set-selections
 fi
diff --git a/build/networking/scripts/host_install.sh b/build/networking/scripts/host_install.sh
index 35ac7ca..423ceee 100755
--- a/build/networking/scripts/host_install.sh
+++ b/build/networking/scripts/host_install.sh
@@ -95,7 +95,7 @@ then
         pip install --upgrade pip && \
         pip install grpcio \
             ovspy \
-            protobuf \
+            protobuf==3.20.1 \
             p4runtime \
             pyelftools \
             scapy \
diff --git a/build/networking/scripts/rundemo.sh b/build/networking/scripts/rundemo.sh
index 7c7a924..efcdd21 100755
--- a/build/networking/scripts/rundemo.sh
+++ b/build/networking/scripts/rundemo.sh
@@ -31,7 +31,7 @@ echo "Creating Ubuntu focal image"
 echo ""

 pushd /root || exit
-/git/ipdk/build/scripts/get-image.sh focal
+/git/ipdk/build/networking/scripts/get-image.sh focal
 rm -f vm1.qcow2 vm2.qcow2
 cp focal-server-cloudimg-amd64.img vm1.qcow2
 cp focal-server-cloudimg-amd64.img vm2.qcow2
@@ -123,6 +123,7 @@ pushd /root/P4-OVS || exit
 . /root/P4-OVS/p4ovs_env_setup.sh /root/p4-sde/install
 /root/scripts/set_hugepages.sh
 /root/scripts/run_ovs.sh
+sleep 10
 popd || exit

 echo ""
以下にて、ビルドを実行します。
SCRIPT_DIR=/git/ipdk/build/networking/scripts /git/ipdk/build/networking/scripts/host_install.shビルドが成功すれば、以下のようにp4とovs関連のコマンドが追加されます(以下はTAB補完時のコマンド候補の出力結果です)。
root@ipdk-kvm:/git/ipdk# p4
p4c          p4c-bm2-psa  p4c-bm2-ss   p4c-dpdk     p4c-ebpf     p4c-graphs   p4c-ubpf     p4test
root@ipdk-kvm:/git/ipdk# ovs
ovs-appctl            ovs-docker            ovs-p4ctl             ovs-tcpdump           ovs-vsctl
ovs-bugtool           ovs-dpctl             ovs-parse-backtrace   ovs-tcpundump         ovs-vswitchd
ovsdb-client          ovs-dpctl-top         ovs-pcap              ovs-test
ovsdb-server          ovs-l3ping            ovs_pipeline_builder  ovs-testcontroller
ovsdb-tool            ovs-ofctl             ovs-pki               ovs-vlan-test
root@ipdk-kvm:/git/ipdk#
これでIPDKを実行可能な環境が完成しました。
デモの実行
cd /root
/git/ipdk/build/networking/scripts/rundemo.sh
このスクリプトでは、大まかに以下の処理が行われます。
- テスト用VMのイメージ(ubuntu 20.04)を取得
- P4-OVSの起動
- simple_l3.p4をコンパイル(以下はrundemo.shの該当部分)
export OUTPUT_DIR=/root/examples/simple_l3/ p4c --arch psa --target dpdk --output $OUTPUT_DIR/pipe --p4runtime-files \ $OUTPUT_DIR/p4Info.txt --bf-rt-schema $OUTPUT_DIR/bf-rt.json \ --context $OUTPUT_DIR/pipe/context.json $OUTPUT_DIR/simple_l3.p4 pushd /root/examples/simple_l3/ || exit ovs_pipeline_builder --p4c_conf_file=simple_l3.conf \ --bf_pipeline_config_binary_file=simple_l3.pb.bin - テスト用VMを二つ起動
- P4-OVSにコンパイルしたP4プログラムをロード(以下はrundemo.shの該当部分)
ovs-p4ctl set-pipe br0 /root/examples/simple_l3/simple_l3.pb.bin \ /root/examples/simple_l3/p4Info.txt - VM間の通信を成功させるのに必要なP4テーブルのエントリを追加(以下はrundemo.shの該当部分)
ovs-p4ctl add-entry br0 ingress.ipv4_host \
    "hdr.ipv4.dst_addr=1.1.1.1,action=ingress.send(0)"
ovs-p4ctl add-entry br0 ingress.ipv4_host \
    "hdr.ipv4.dst_addr=2.2.2.2,action=ingress.send(1)"
- VM1
telnet localhost 6551
- VM2
telnet localhost 6552
ubuntu@vm1:~$ ping 2.2.2.2
PING 2.2.2.2 (2.2.2.2) 56(84) bytes of data.
64 bytes from 2.2.2.2: icmp_seq=1 ttl=64 time=1.73 ms
64 bytes from 2.2.2.2: icmp_seq=2 ttl=64 time=0.561 ms
64 bytes from 2.2.2.2: icmp_seq=3 ttl=64 time=0.279 ms
^C
--- 2.2.2.2 ping statistics ---
3 packets transmitted, 3 received, 0% packet loss, time 2004ms
rtt min/avg/max/mdev = 0.279/0.855/1.725/0.625 ms
ubuntu@vm1:~$
まとめ
本記事では、IPDKのデモ環境を仮想マシン内に構築して、試験する方法を共有させていただきました。記事の中にも記載していますが、IPDKでは、P4プログラムをP4-OVS (P4を実行できるように拡張されたOpen vSwitch)にて実行させています。このP4-OVSを、P4プログラマブルスイッチやIPU/DPUにて動作させることで、ハードウェアレベルでP4によってネットワーク機能を拡張できる環境が今後整っていくと期待しています。今後もIPDKの進展を見ながら、色々と試していきたいと思います。