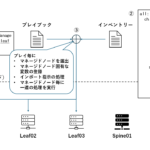
Tofino モデルシミュレータを使ったP4プログラムのテスト
ここでは、予め用意されたP4のサンプルプログラムを、Tofinoモデルシミュレータという、Tofino ASICの動きを疑似するツールを使ってテストをしてみたいと思います。用意されているP4のサンプルプログラムは以下です。
$ ls ~/open-p4studio/pkgsrc/p4-examples/p4_16_programs
bri_grpc_error                       tna_action_profile   tna_field_slice             tna_ports
bri_handle                           tna_action_selector  tna_idletimeout             tna_proxy_hash
bri_set_forwarding_pipeline          tna_alpm             tna_lpm_match               tna_pvs
bri_with_pdfixed_thrift              tna_bridged_md       tna_meter_bytecount_adjust  tna_random
common                               tna_checksum         tna_meter_lpf_wred          tna_range_match
p4rt_utests                          tna_counter          tna_mirror                  tna_register
README.md                            tna_custom_hash      tna_multicast               tna_resubmit
selector_resize                      tna_digest           tna_operations              tna_snapshot
t2na_counter_true_egress_accounting  tna_dkm              tna_pktgen                  tna_symmetric_hash
tna_32q_2pipe                        tna_dyn_hashing      tna_port_metadata           tna_ternary_match
tna_32q_multiprogram                 tna_exact_match      tna_port_metadata_extern    tna_timestamp
これらのプログラムをビルドして得られた生成物は以下に展開されています。
$ ls ~/open-p4studio/install/share/tofinopd
bri_grpc_error           tna_action_selector  tna_dyn_hashing             tna_multicast             tna_random
bri_handle               tna_alpm             tna_exact_match             tna_operations            tna_range_match
bri_with_pdfixed_thrift  tna_bridged_md       tna_field_slice             tna_pktgen                tna_register
selector_resize          tna_checksum         tna_idletimeout             tna_port_metadata         tna_resubmit
tna_32q_2pipe            tna_counter          tna_lpm_match               tna_port_metadata_extern  tna_snapshot
tna_32q_multiprogram_a   tna_custom_hash      tna_meter_bytecount_adjust  tna_ports                 tna_symmetric_hash
tna_32q_multiprogram_b   tna_digest           tna_meter_lpf_wred          tna_proxy_hash            tna_ternary_match
tna_action_profile       tna_dkm              tna_mirror                  tna_pvs                   tna_timestamp
ここでは、"tna_counter"という名前のP4のサンプルプログラムを使ってテストを実行してみます。まず、仮想マシン内でパケットの送受信のテストを行うために、仮想NIC (veth) を作成します。この操作は仮想マシン起動後に一度だけ実施すればOKです。
sudo ${SDE_INSTALL}/bin/veth_setup.sh 128
P4プログラムのテストを実行するために、3つのウィンドウを開き、それぞれ、以下の順番でコマンドを実行します。まず、Tofinoモデルシミュレータを起動します。
$ cd ~/open-p4studio/
$ ./run_tofino_model.sh -p tna_counter --arch tofino
Using SDE /home/adpro/open-p4studio
Using SDE_INSTALL /home/adpro/open-p4studio/install
Model using test directory: /home/adpro/open-p4studio/pkgsrc/p4-examples/p4_16_programs/tna_counter
Model using port info file: None

...

Simulation target: Asic Model
Using TCP port range: 8001-8004
Listen socket created
bind done on port 8001. Listening..
Waiting for incoming connections...
CLI listening on port 8000
次は、別のウィンドウにて、"tna_counter"のP4サンプルプログラムをロードします。
$ cd ~/open-p4studio/
$ ./run_switchd.sh -p tna_counter --arch tofino
Using SDE /home/adpro/open-p4studio
Using SDE_INSTALL /home/adpro/open-p4studio/install
Setting up DMA Memory Pool
Using TARGET_CONFIG_FILE /home/adpro/open-p4studio/install/share/p4/targets/tofino/tna_counter.conf

...

2025-01-18 08:56:12.707561 BF_SWITCHD DEBUG - bf_switchd: spawning cli server thread
2025-01-18 08:56:12.708289 BF_SWITCHD DEBUG - bf_switchd: spawning driver shell
2025-01-18 08:56:12.708761 BF_SWITCHD DEBUG - bf_switchd: server started - listening on port 9999

        ********************************************
        *      WARNING: Authorised Access Only     *
        ********************************************


bfshell>
最終的に、bfshellというシェルが実行可能なプロンプトが表示されれば、P4プログラムのロードは完了です。これで、TofinoモデルシミュレータにP4プログラムがロードされ、P4のプログラムに従ってデータプレーンが動作する状態になっています。そこで、別のウィンドウにて、予め用意されたPTF(Packet Test Framework)というパケット送受信を行うテストを実行します。
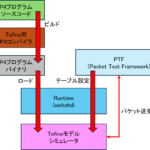
$ cd ~/open-p4studio/
$ ./run_p4_tests.sh -p tna_counter --arch tofino
PTFテストを実行するとパケットの送受信が行われますが、Tofinoモデルシミュレータを開いたウィンドウにてP4プログラムが実際に実行したパケット制御がログとして出力されます。また、PTFテストを実行したウィンドウでは、予め用意されたテストの実行結果(例えば以下のような)が出力されます。
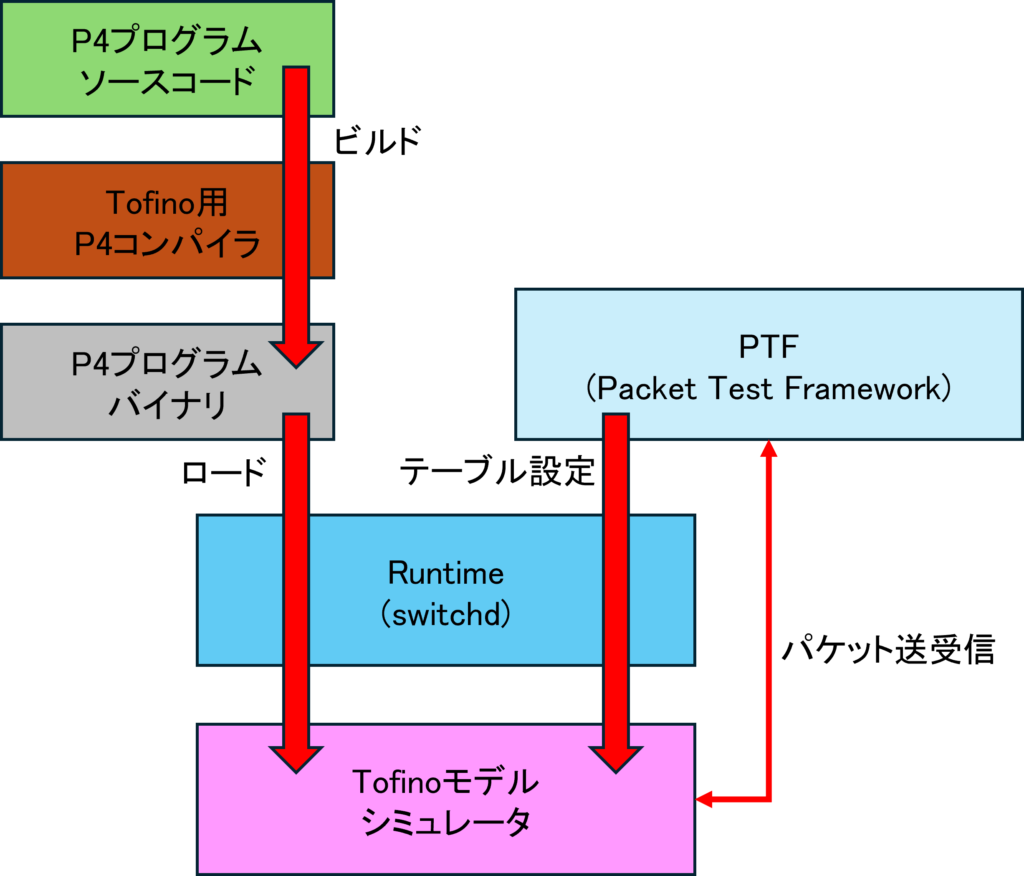
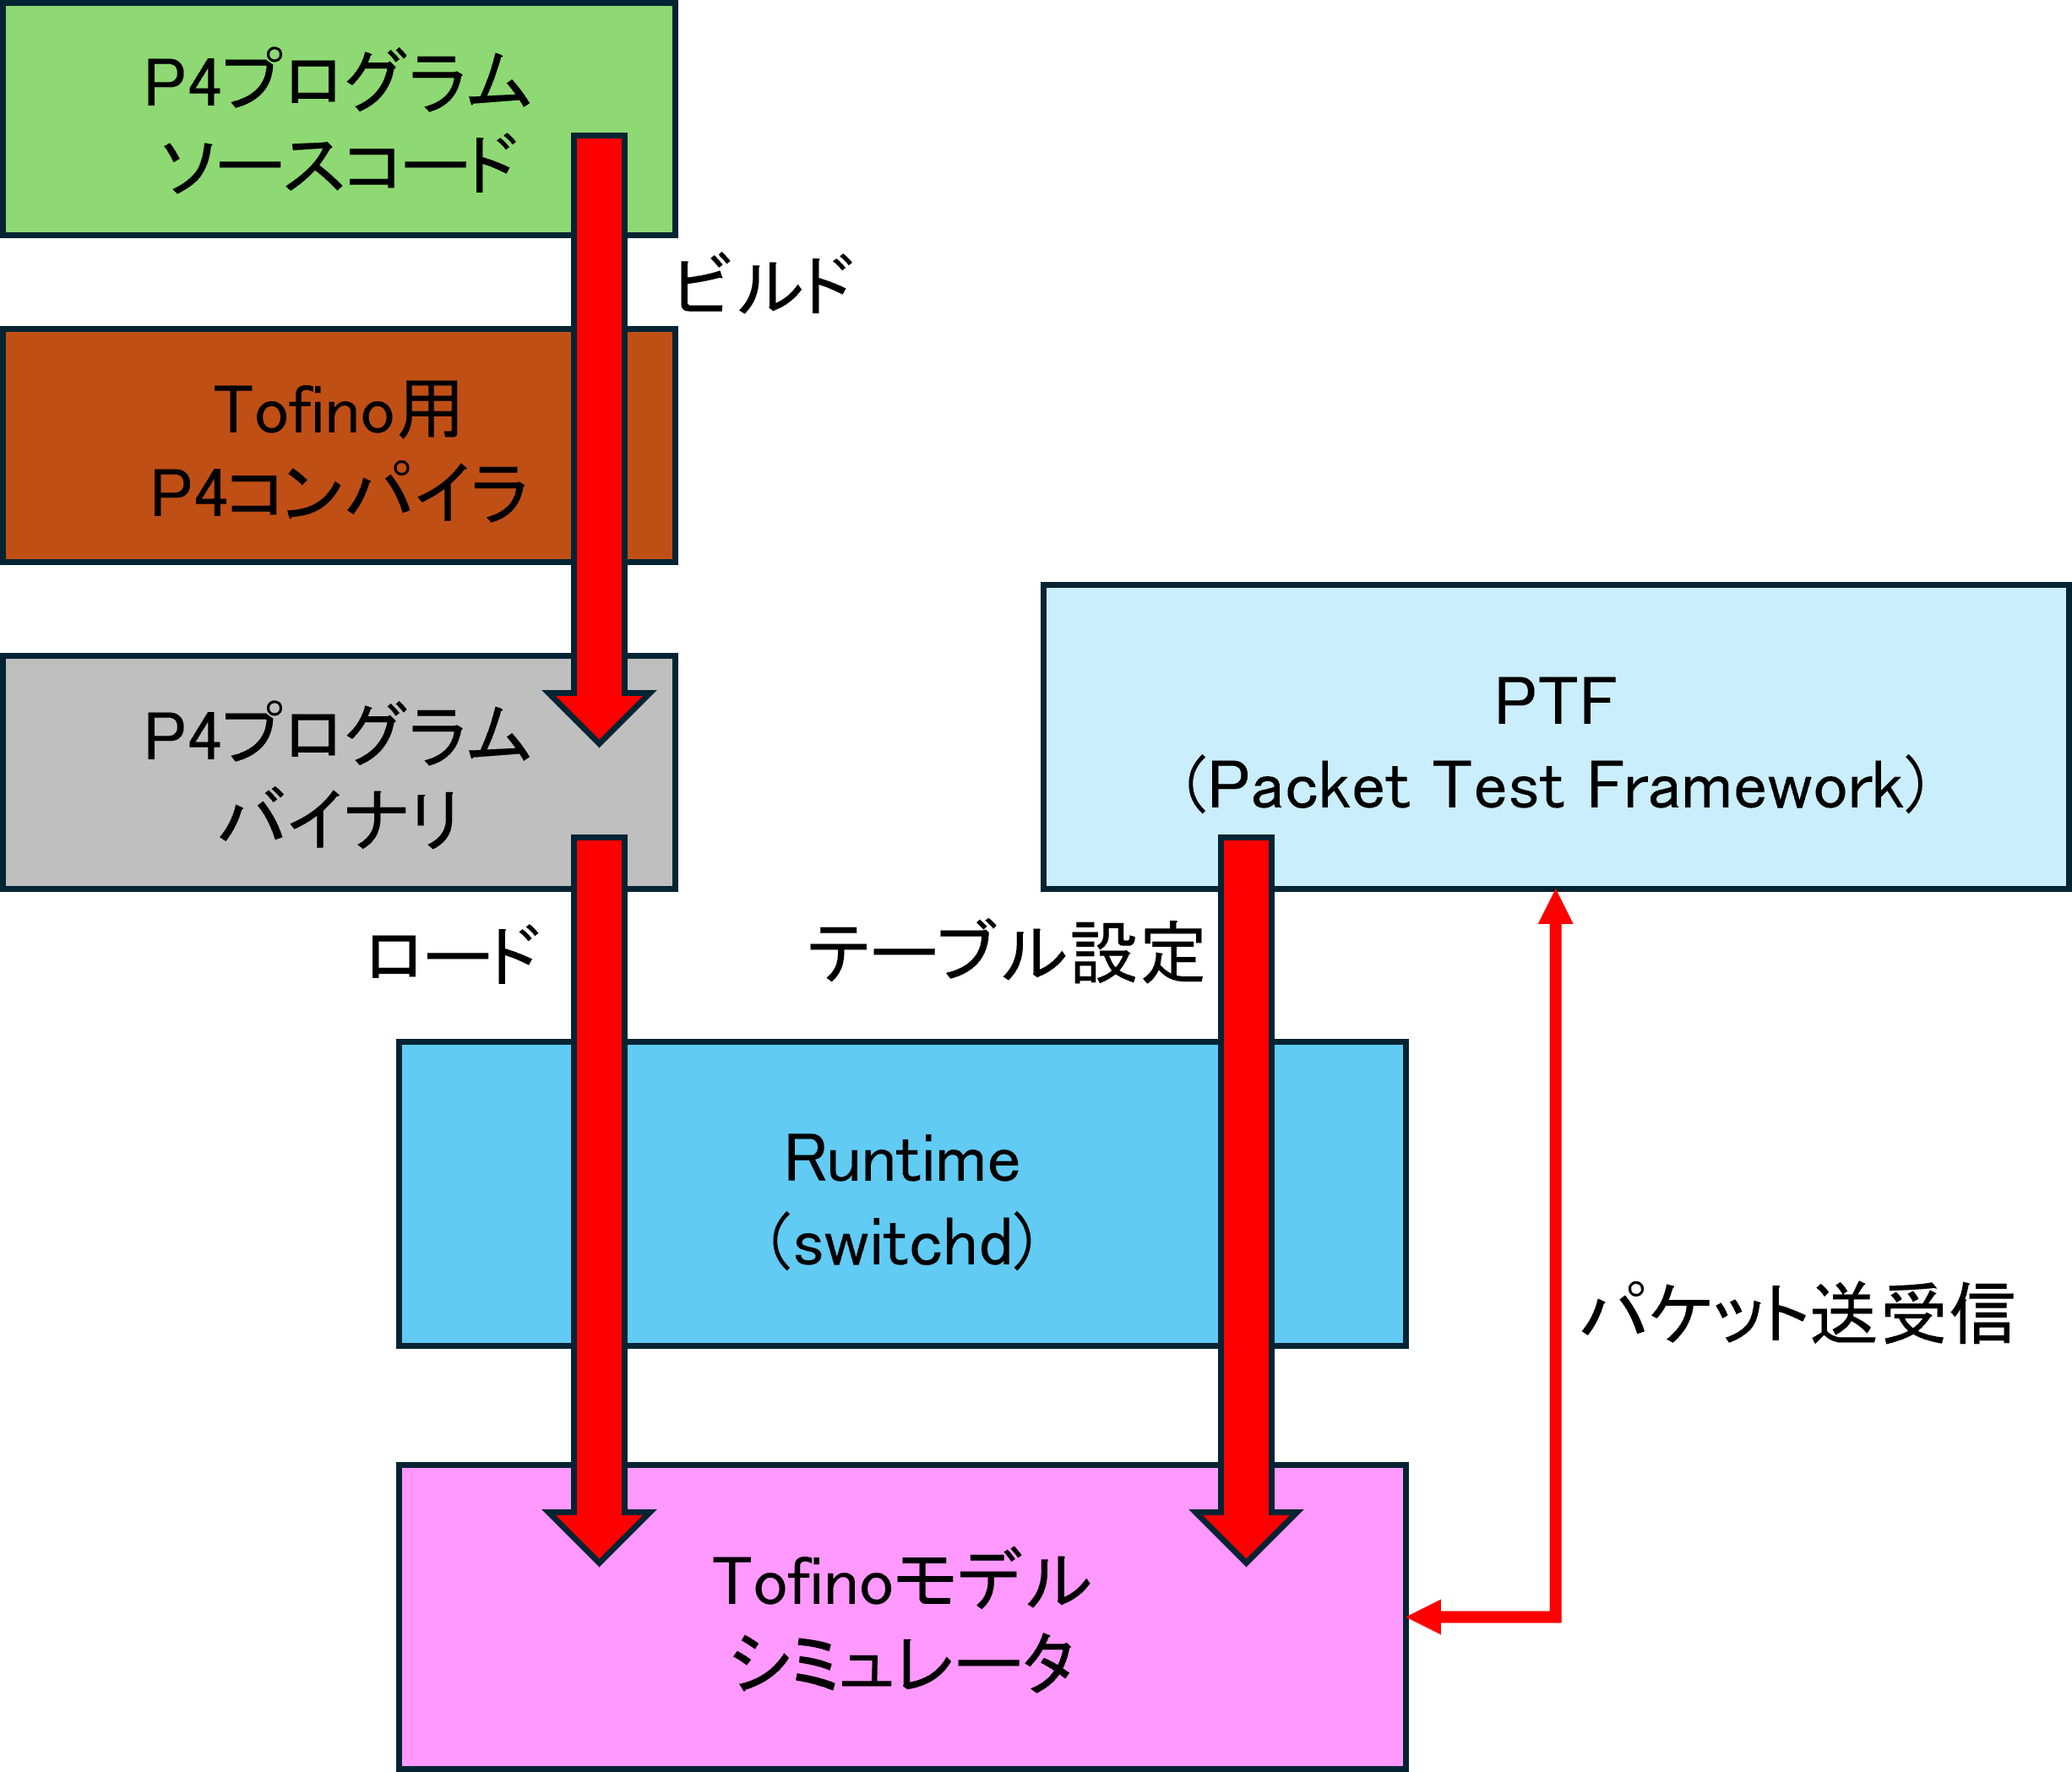
test.IndirectCounterLatencyTest ... Subscribe attempt #1
Subscribe response received 0
Received tna_counter on GetForwarding on client 0, device 0
Binding with p4_name tna_counter
Binding with p4_name tna_counter successful!!
This test is meant to be run only on hardware. Thus simply returning
ok

----------------------------------------------------------------------
Ran 1 test in 0.168s

OK
このような流れで、P4プログラムを実行して、テストを実行することが可能です。ここまで実施した操作をイメージにすると以下のようになります。